Manage orders
In the order card, you can view order details, call the customer, and mark the order as completed.
View order details
Open the order card according to your selected route view in the app.
-
Find the order on the map.
-
Tap the order to view its card.
-
To see the details:
- Drag the control element at the bottom of the screen up.
- Tap in the order card.
- Find your order.
- Tap the order to open its card.
Order card
Order cards are made up of multiple cells:

-
Delivery sequence number in the route.
-
Timeframe for completing the order.
-
Information about the customer.
-
Order status.
-
Confirm the delivery time. Displayed if the order delivery time hasn't been confirmed.
-
Specify the coordinates of the delivery location.
-
Call the customer. The button won't be displayed if the phone number has a wrong format.
-
Order weight (if specified).
-
Indication that the order needs to be picked up from the customer.
-
Order status comment.
To write or edit a comment, tap and save the changes. Messages longer than four lines will be collapsed. To see the entire comment, tap Expand.
Example: "I've called three times, but they keep rejecting my calls".
-
External order number.
-
Order number assigned during planning.
-
Order delivery address.
-
Coordinator's comment.
-
Show the order on the map.
-
Edit the order status comment.
-
Delivery address. Displayed if the orders are related.
-
Order contents (if specified).
-
Add a photo of the order.
-
Change the order delivery time.
-
Use this button to send a message with order details. For more information, see Share order details.
-
Menu for changing the order status: Completed, Partially delivered, or Canceled.
-
Tap Completed if the order was delivered in full.
-
Tap Navigation to plot a route to the order in Yandex Navigator, Yandex Maps, or RouteQ.
-
The element appears when multiple orders are located at the same address. Use it when handling multi-orders.
-
Time spent within the order radius and distance to it. Displayed if automatic delivery is enabled.
When the order status changes to Completed, Partially delivered, or Canceled, only the completion time and the customer's address are displayed in its card. To see the customer's phone number, reopen the task.
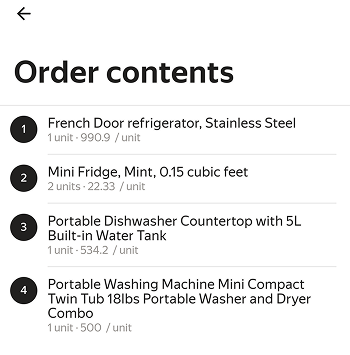
View order contents
To see which items you need to get from the vehicle and deliver to the client, click the link with the number of items in the Order contents section. You'll see the list of items and their cost.
Share order details
Note
By default, the Share order details button is only available to RouteQ Lite clients.
If you need to share order details, but there's no button, contact your logistics coordinator.
Use this button to share a message with order details:
- With your contacts in messengers or via SMS.
- Via the social media you use.
Information that's sent in the message:
- Order number.
- External customer number.
- Courier's phone.
- Customer contact information.
- Delivery address.
- Order status.
- Delivery time.
Adding photos
You can add photos:
- To order cards, to confirm delivery and proper condition of items.
- To depot cards, to confirm receipt or return of items.
Note
If the option is unavailable, contact the logistics coordinator. Only RouteQ clients can add photos.
Use the widget:
-
Open the order or depot card.
-
Tap Add photo .
-
Select an action:
-
Take photo — Take one or multiple photos from the app.
-
 — Add one or multiple photos from the gallery at the same time.
 -
— Return to the order or depot card.
You can attach no more than 10 photos at a time. Any photos beyond this limit won't be added. The total number of photos you can add is not limited.
-
-
After selecting the photos, tap Done. The photos will be displayed in the preview.
-
Tap Done.
Supported formats are JPEG, PNG, and HEIC.
You will not be able to attach photos without an internet connection. Try doing it again once you're online.
Note
If the logistics coordinator has enabled the mandatory photo verification option, you won't be able to complete the delivery or leave the depot without adding photos.
To add a photo to the existing ones:
-
Open the order or depot card.
-
Tap .
-
Repeat steps 3 through 5 following the instructions above to add a photo.
To delete a photo:
-
Open the order or depot card.
-
Tap on the thumbnail of the photo you wish to remove.
Specifying coordinates
The location of loading and unloading the delivery does not necessarily match the location of your destination. For instance, your destination might be a building of unusual shape, with multiple access points. In such cases, specifying the coordinates of your delivery location will make the delivery easier and quicker next time you arrive there.
- Open the order card.
- Tap next to the delivery address.
- Specify the position of your destination by moving the map.
- Tap Save address.
Note
Courier coordinates are stored in the RouteQ app for 1 day. If there's no internet access, the data is saved locally and transmitted when the connection is restored.
Update order status
To mark the current status of an order in your route, open the order card and select one of the options:
-
Completed, if the order has been successfully delivered.
-
→ Partially delivered, if only part of the order has been delivered.
-
→ Canceled, if the order couldn't be delivered.
The Completed or Partially delivered buttons are available in manual delivery mode. For more information about partial delivery, see the Additional features section.
Note
You won't be able to mark the order as completed if:
- The related pickup orders are not yet completed. First, specify the status of related orders.
- The logistics coordinator has enabled the mandatory photo verification option. In this case, you won't be able to complete the delivery without adding a photo to the order card.
You can complete a delivery even when you're offline. If you can't mark an order as completed, contact your logistics coordinator. For more information, see Order statuses.
When the order status changes to Completed, Partially delivered, or Canceled, you can see the time when that happened in the order details.
To return a completed order to active status, open it and tap Reopen task.
Multi-orders
If you have multiple orders associated with the same address, they will be combined into a single multi-order.
To see all orders in a multi-order:
Select the multi-order on the map.
Tap the View orders button.
The multi-order card will open.
If you're in manual delivery mode, you'll see the All orders completed button. Tap it to register the delivery of all orders in a multi-order (excluding canceled and partially delivered orders).
To close the card and go back to the route, tap .