Additional features
This page describes features that are not included in the application's basic feature suite.
The feature set of your application depends on your company settings. If a setting has been changed, restart the app for the change to take effect.
Optimizing a route
Route optimization features:
-
The feature is available only to RouteQ clients.
-
In Routing Workspace, you must have the permission to edit routes (the icon in the upper-right corner of the screen). To enable this feature, contact the logistics coordinator.
-
Only routes without intermediate depots can be optimized.
To optimize a route:
- Tap in the upper-right corner of the screen.
- Tap Optimize.
- If the number of delays has decreased, tap Save.
- Tap in the upper right corner of the screen.
- Tap the icon in the line with the order address and drag it to a different location.
- If the number of delays has decreased, tap Save.
You can't save route changes without an internet connection. Try optimizing the route again once you're online.
For related orders, only the following sequence is available:
-
A
pickuporder must be completed before a delivery order. -
A
deliveryorder must be completed after a pickup order or after visiting a depot to pick up the order from.
Partial delivery
If the order hasn't been completed in full:
-
In the order card, tap → Partially delivered → Save and continue.
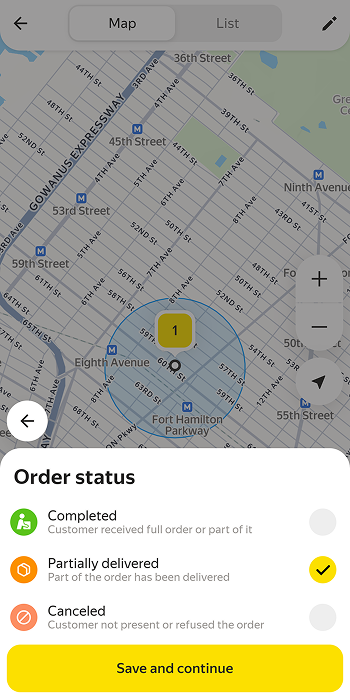
-
Indicate the reason for the return:
- Product is damaged
- Packaging is damaged
- Client refused
- Wrong product
- Incomplete order
- Postponed by client
Note
The list of reasons depends on your company's settings and may be different. If return reasons aren't configured in the company settings, the list will only contain the Your comment option. Select it to enter a custom reason.
-
Tap Next.
-
If necessary, edit the reason for the return and tap Submit.
Some companies may require mandatory photo verification. In this case, you can't complete an order without a photo attached. Take a photo of the order and attach it.
The company manager will then see the status Partially delivered and your reason for setting the status.
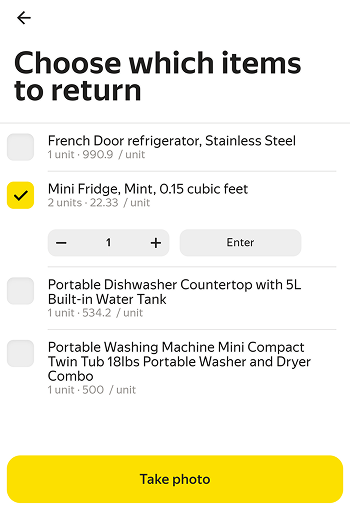
Partial delivery if order contents are specified
If the order has a list of items to be delivered, you can specify which and how many items were returned by the client and add photos (for example, to show defects). To do this:
-
In the order card, tap → Partially delivered → Save and continue.
-
Choose your reason:
- Product is damaged
- Packaging is damaged
- Client refused
- Wrong product
- Incomplete order
- Postponed by client
Note
The list of reasons depends on your company's settings and may be different. If return reasons aren't configured in the company settings, the list will only contain the Your comment option. Select it to enter a custom reason.
-
Select the items returned by the client.
Use the + and — buttons to specify the quantity of items to be returned. If the client is returning a lot of items, tap Enter and enter the value manually.
-
Attach a photo of each item if the company requires photo verification.
-
Tap Next.
-
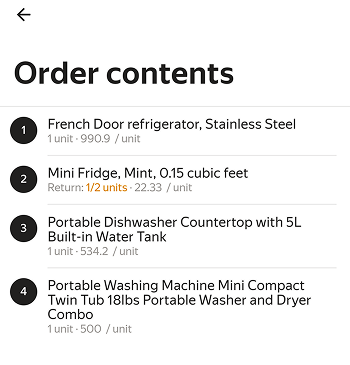
Check the order contents. Make sure that the reason for the return and the quantity of returned items are correct. If necessary, attach a photo.
-
Tap Complete order.
To see which items were returned by the client, open the order card and tap the number of items in the Order contents section.
Your manager will see the Partially delivered status, information on returns, and attached photos (if any).
Manual status updates with automatic delivery enabled
If the automatic delivery mode is enabled, order and depot statuses change automatically:
-
Order status changes to Completed.
-
Depot status changes to Visited.
However, automatic delivery may not work if the GPS loses signal. If you have the permission to manually confirm visits and deliveries, you'll see the buttons in the cards:
-
Completed, for orders.
-
Visited, for depots.
To enable this feature, contact the logistics coordinator.
Photo verification
The option can be enabled for:
To enable photo verification, contact the logistics coordinator.
For orders
If the photo verification option is enabled for orders, you can't complete the delivery until at least one photo is added to the order card.
Note
Photo verification is not required if:
- The logistics coordinator has enabled the automatic delivery option.
- The order was canceled.
To deliver an order that requires photo verification:
- Mark the order as completed.
- Enter the verification code sent to the recipient via SMS and tap Done.
- Tap Open camera and attach a photo.
For depots
If the photo verification option is enabled, you won't be able to leave the depot without adding photos. To leave the depot:
- Tap Visited.
- Tap Open camera and attach a photo.